This page is about the process of Raku firing. Raku firing is one of the most exciting and rewarding ceramic processes. The more you fire the more you learn. There are so many factors that go into how your piece will turn out: the temperature you pull at, the temperature outside that day, how fast you go into the can, how fast the paper ignites, how long you hold the piece in the flames before you set it down, and how quickly you get the flames out when you put the lid on the can; that's just the part about pulling the piece from the kiln. It all really starts with the glaze you use, how well you apply the glaze, the reduction chamber you use, and how well you prepare it for reduction. All these factors determine how the piece will look and each time you fire you get to see how well you perform; each time you open a can to uncover a piece it is like opening a present to yourself.
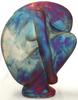
I am now offering my Copper Matte Raku Glaze for sale. It is without a doubt the best raku glaze I have ever seen and will give you a verity of colors that range from the darker copper reds, cobalt blues, and purples to the lighter pastel colors of pinks, gold's, and light blues. This glaze is what I use in combination with all my techniques. At my workshops I show how I do all my glazing technique and if you are interested please email me for more information.
I use Duncan's Pure Brilliance Clear Glaze under my Copper Matte in all my techniques like the Oriental Grass, the Sponged, and the Spattered, except the plain Copper Matte which is beautiful on its' own. You may find some nice reactions that you didn't expect. Raku is one of those things you never know what you will get till you try it. There are no rules in raku, you get to make them by trail and error. I have been playing with it for over 30 years and I still love it today as much, if not more than the first time I pulled that piece and threw it into the can and then in about 15 minutes opened the can and looked at this thing. It wasn't that pretty but it was exciting and it made me want to try it again. Of course back then I would pull it out of the can and quickly quench it in water and more than half the time the piece would crack.
I use hobby ceramic slip for my work. I'm using Standard Mid-Range Ceramic Slip now, because the Low-Fire Slip I used for 40 something years is off the market because it was made with Ceramic Talc. Ceramic Talc is no longer available because it was a cancer agent. Bisque your piece no hotter than cone 06, I go to 07.
The kiln you use is another major factor in how your colors come out. If you use an electric kiln with a cone setter, fire to cone 07. If like me, you use a computer kiln for raku, take it to 1700F, the drop and hold at 1600F to start your pull. I find electric kilns to be the most consistent way of firing raku because it is always in oxidation, the temperature is controlled, and it will hold the temperature at the top and quickly go back up the the pulling temperature. I never turn my kiln off to pull, I've never been shocked. If you are using gas, remember not go too fast, especially the last 200 degrees. Make sure you are firing in oxidation and not reducing as you are firing your raku. This means no flames shooting out the top hole.
REDUCTION: I use newspaper in the can for the combustible material. I line the cans with 2 sheets of paper standing around the walls and then put 2 single sheets on the bottom, pushing them flat. I don't use any shredded paper, because you will get more scaring. I use 4 different size cans depending on the size of the piece I am pulling, 30 gal, 20 gal, 10 gal, and 6 gal.
Some more tips for Raku firing. 1) The first way of creating colors is when you pull the piece. By letting the piece cool as you bring it from the kiln makes the colors lighter, but the hotter the piece is when you catch the paper of fire will bring out the darker coppers and deep blues. Go into the can slowly getting the fire started by setting the piece in the middle on the bottom of the can, let the flames work, but not touching the sides. put the lid on the can. You don't need to pop the lid. But if you do pop the lid to allow some air in, do it very quick or just loosen the lid. you don't need to flash or fan the flames. I don't pop the lid any more, but some people like to do it. This is where your timing and experimentation is most used. You will learn from the size of the piece and the weight of the piece how long you can take going into the can, never get too hurried. 2) Let your pieces totally cool in the can, especially if it is a thick (heavy) piece. The color will stay longer if you don't rush and remove the piece. (15 minutes is not long enough!) I allow about an hour in the can. 3) After you have removed the piece from the can clean it off with a stiff brush. 4) Until you are going to show or sell the piece, put it in a plastic bag to store it. Raku should never be left out in the sun and it does best in a cool dry place.
Raku is fun and you should have fun doing it. Always remember to be safe though, you are playing with fire.
 Loading... Please wait...